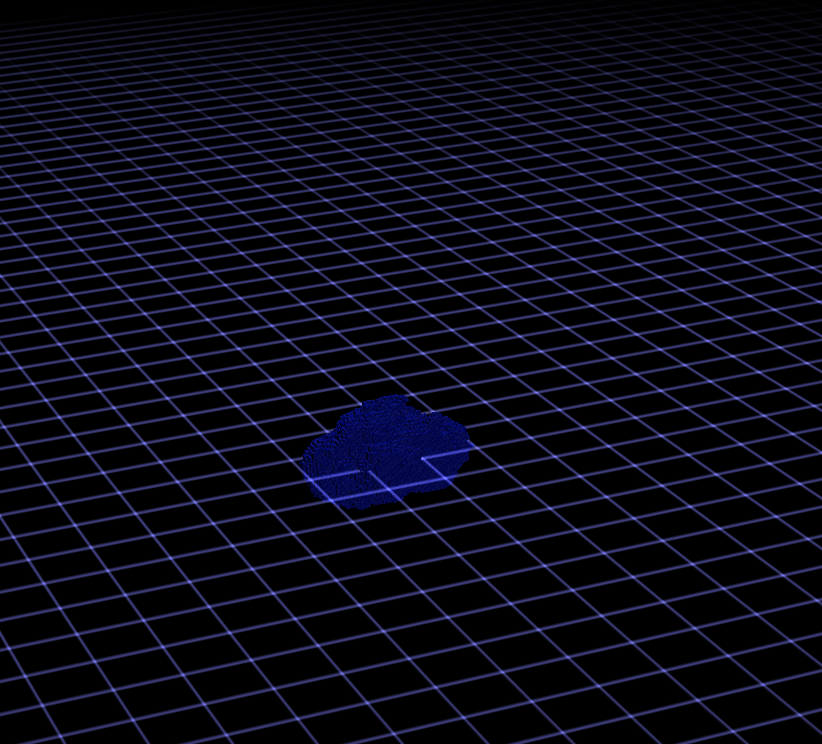
 Shortly I discovered that drawing a proper beam is a really complex issue. I tried to draw a grid, but beams are also useful for lighting effects as god-rays or laser weapons. Of course you can draw a single line with just rendering lines (or wireframe). Unfortunately such lines are sharp and thin - good for a laser weapon but not for the rest. I started with single lines and found them not appropriate for my grid on FullHD resolution.
After expanding lines with a geometry shader I found some Problems:
- Vertex coordinates behind the camera caused entire beams vanishing
- Texture coordinate Interpolation got broken
I solved both by manually reimplementing pipeline stages which took me a day. So I though you might be interested in my solution.
Spanning the Beam with a Geometry Shader
The easy idea where everything begun: Create a billboard in the geometry shader.
For an input of two vertices from a line compute a vector which is perpendicular to the line and the view direction. Add this new vector as offsets to the ends and emit a thin quad with two corners at on end and two at the other end. I did the offsetting directly in projection space to avoid the requirement for more matrices and transformations. This is not the common approach and might be confusing.
You can see the implementation in the code in the next section. I added a scaling * l1.w to the offset vector to make the beam zoom invariant. This is because I will use it to render selections, ... of objects and don't want the handles to vanish at far distances. Later I discovered that this causes problem two and I removed it.
The next step was to smooth the quad borders in pixel shader. Therefore I created "texture coordinates" and used them to compute the distance of a fragment to the beam border.
|
1 2 3 4 5 6 7 8 9 |
void main() { // Fading along the line direction only close to the ends float fadeLong = max(0, abs(gs_TexCoord.x) * c_fFadeScale - c_fFadeOffset); fadeLong = max(0, 1 - fadeLong * fadeLong); // Maximal smooth fading about beem width float fadeShort = max(0, 1 - gs_TexCoord.y * gs_TexCoord.y); ps_FragColor = gs_Color * fadeShort * fadeLong; } |
Vanishing Triangles through Projective Space
Everything worked fine and than I enlarged my grid...
It is a matter of fact that if a vertex of a triangle is behind the camera the full triangle is culled. This is because in perspective space a vertex behind the camera has undefined coordinates - the camera itself is a singularity. It has nothing to do with the clipping algorithm, which would work well if a vertex is between near plane and camera. To avoid the negative coordinates you need to do clipping of the triangle yourself before perspective division.
The clipping must do two things: Move the vertex and interpolate its data. The lines 24-34 are doing this. Since I would like to clip a ray it becomes easier than with triangles. I project the end points along the ray direction to the nearplane. For a triangle do that on each edge. Important: the direction is the full 4D vector in homogeneous space. To figure that out I required most of the time.
|
1 2 3 4 5 6 7 8 9 10 11 12 13 14 15 16 17 18 19 20 21 22 23 24 25 26 27 28 29 30 31 32 33 34 35 36 37 38 39 40 41 42 43 44 45 46 47 48 49 50 51 52 53 54 55 56 57 58 |
#version 330 #define OUT_VERTS 4 in vec4 vs_Color[2]; in vec3 vs_Position[2]; out vec4 gs_Color; // x/w, y/w, 1/w for perspective correction noperspective out vec3 gs_TexCoord; layout(lines) in; layout(triangle_strip, max_vertices = OUT_VERTS) out; layout(std140) uniform ... // Shortened this listing here void main(void) { // Transform to projection space - the rest is done directly in screen space vec4 l1 = vec4(vs_out_Position[0], 1) * c_mWorldViewProjection; vec4 l2 = vec4(vs_out_Position[1], 1) * c_mWorldViewProjection; // Do a manual clipping. vec4 direction = normalize(l2 - l1); // Compute original distance for texture coordinate reprojection. float len = length(l2.xyz - l1.xyz) * 0.5; // Reproject end points to the near-thresholdplane if( l1.z < c_fNearPlane ) l1 -= direction * (l1.z-c_fNearPlane) / direction.z; float tex1 = 1.0 - length(l2.xyz - l1.xyz) / len; if( l2.z < c_fNearPlane ) l2 -= direction * (l2.z-c_fNearPlane) / direction.z; float tex2 = length(l2.xyz - l1.xyz) / len - 1.0; // Compute a vector perpendicular vector to create a beam vec2 dir = normalize(l2.xy / l2.w - l1.xy / l1.w); // Cross product with view direction vec4 perpendicular = vec4(-dir.y * 0.2, dir.x * 0.2, 0, 0); gs_Color = vs_out_Color[0]; gl_Position = l1 + perpendicular * l1.w; gs_TexCoord = vec3(tex1 / l1.w, -1.0, 1.0 / l1.w); EmitVertex(); gl_Position = l1 - perpendicular * l1.w; gs_TexCoord = vec3(tex1 / l1.w, 1.0, 1.0 / l1.w); EmitVertex(); gs_Color = vs_out_Color[1]; gl_Position = l2 + perpendicular * l2.w; gs_TexCoord = vec3(tex2 / l2.w, -1.0, 1.0 / l2.w); EmitVertex(); gl_Position = l2 - perpendicular * l2.w; gs_TexCoord = vec3(tex2 / l2.w, 1.0, 1.0 / l2.w); EmitVertex(); EndPrimitive(); } |
Perspective Interpolation
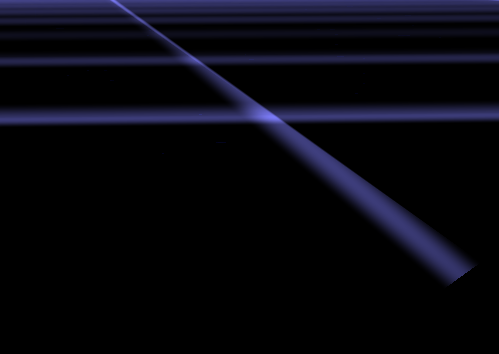
Without perspective correction
For any data interpolated over a triangle in screen space artifacts appear. If you search for the heading you will find pictures illustrating the problem. The first picture on the right also shows what happens when doing non-corrected interpolation. To implement that use the qualifier: noperspective out vec3 gs_TexCoord; . The standard behavior or the qualifier smooth will let the hardware doing the correction. But then I got image two which was worse. Another problem was that in certain angles the lines faded out if not using corrected coordinates. So I tried to combine them.
To do perspective correct interpolation manually one can interpolate (u/w) , (v/w) and (1/w) instead and compute u = (u/w)/(1/w) in the pixel shader. This is what happens to the coordinates in the listing. I only correct the "long" direction of the ray and let the short uncorrected. The solution created stable lines but with the artifacts from picture one.
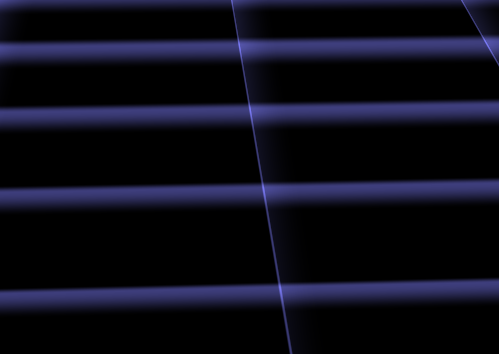
With perspective correction
During writing this post I discovered that my zoom invariant scaling caused this problem. I do not recommend using it. If you need it rather set
c_fLineWidth to a value which depends on the object distance. I removed the scaling and the semi-correction after writing this.
Lesson learned: Write down what you did to see what you can improve.